
Resize Images for Social Media Without Cropping Important Content
Published on 10 Aug 2026
Learn how to resize images for Instagram, YouTube, Facebook, LinkedIn, X, and WhatsApp without losing important content. See how safe zones, focal points, and correct dimensions can prevent unwanted cropping.
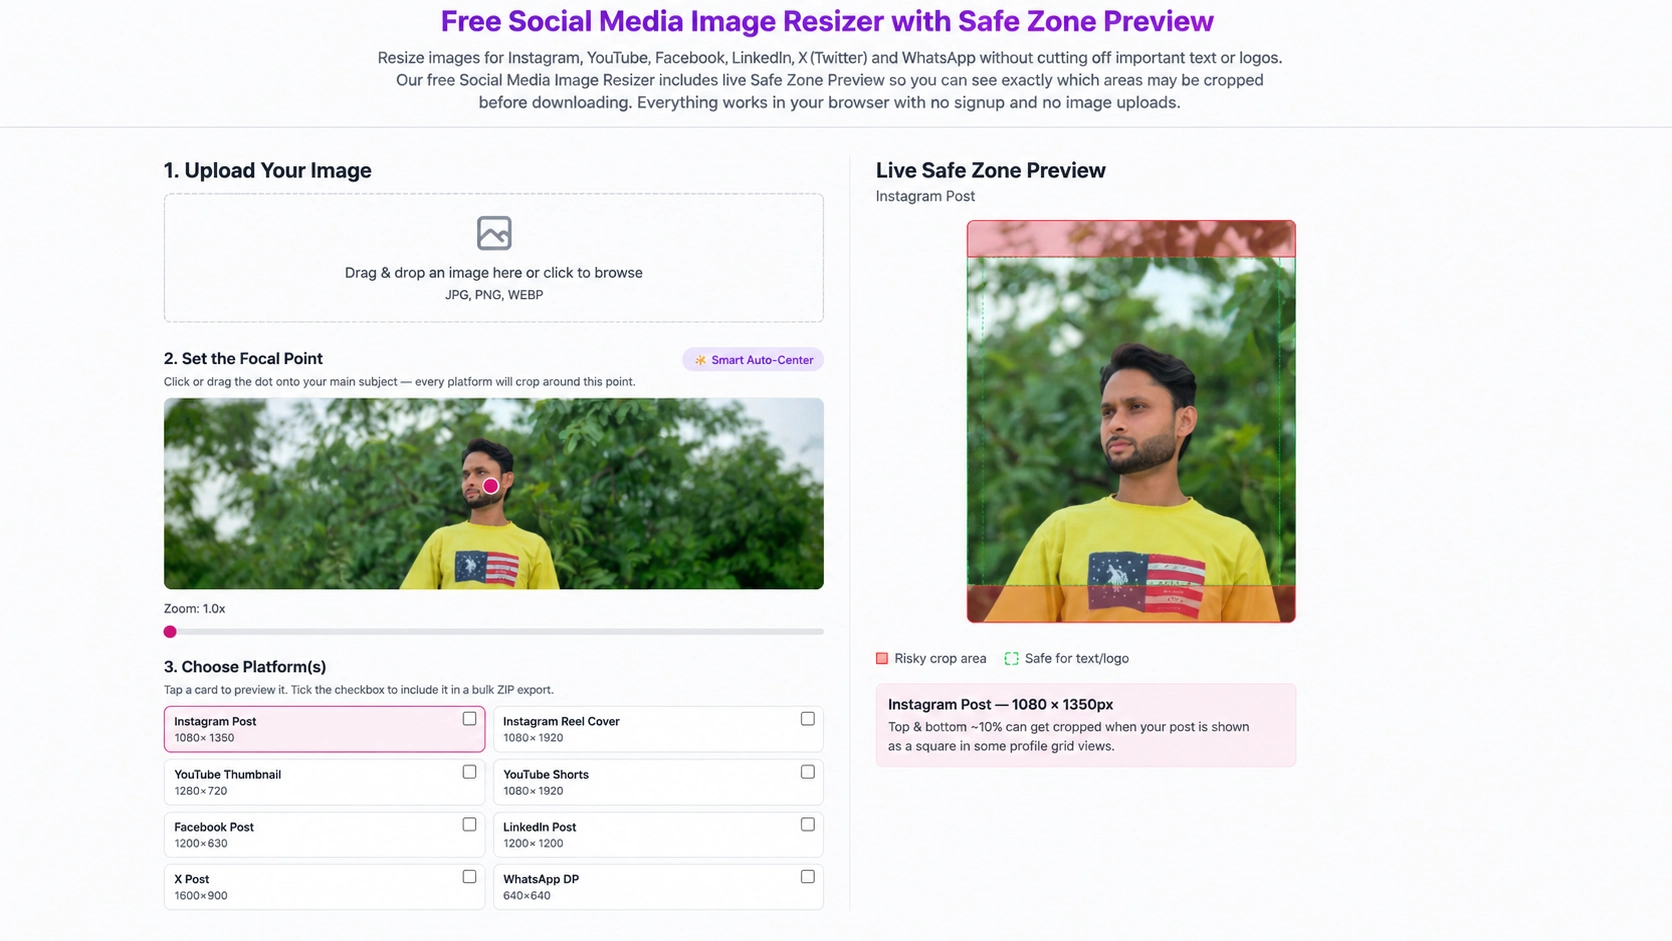
Creating one image for social media is easy. Creating the same image for multiple platforms without losing important content is a different story.
Instagram, YouTube, Facebook, LinkedIn, X, and WhatsApp all display images differently. An image that looks perfect in your editor can be cropped differently when you upload it to another platform.
The problem becomes even more noticeable when your image contains a headline, logo, product, face, or other important visual elements.
The good news is that you don't always need to redesign the image from scratch.
With the right image dimensions, focal point, and safe zone, you can resize one image for multiple social media platforms while keeping the important parts visible.
If you want to test your image while reading this guide, try our Free Social Media Image Resizer with Safe Zone Preview.
In this guide, we'll explain how to resize images for social media, what safe zones are, why images get cropped, and how to preview the result before downloading.
Why Do Social Media Images Get Cropped?
Social media platforms use different image ratios and layouts.
For example, a landscape image may work well for one platform but require a completely different crop for a vertical post.
When an image doesn't match the target aspect ratio, the platform may automatically crop it to fit.
This can result in:
- Important text being cut off
- Logos disappearing from the frame
- Faces being positioned too close to the edge
- Product images losing important details
- Headlines becoming difficult to read
- Important parts of an image being hidden behind interface elements
This is why simply changing the image dimensions isn't always enough.
You also need to consider where the important content is positioned inside the image.
What Is a Social Media Safe Zone?
A safe zone is an area of an image where you can place important content such as text, logos, faces, products, or calls to action with a lower risk of being cropped or covered.
Think of it as a protected area inside your image.
The outer edges of an image can sometimes be cropped depending on how the platform displays the content.
For example, vertical content may have interface elements near the top, bottom, or sides. Keeping your important content away from these areas makes your design more reliable across different screens.
Our Social Media Image Resizer with Safe Zone Preview lets you see these areas visually before exporting your image.
Instead of guessing, you can check the preview and move your subject to a better position.
Why Normal Image Resizers Are Not Always Enough
Most image resizer tools focus on one thing:
Changing the dimensions of an image.
You enter a width and height, resize the image, and download it.
That works when you only need a specific pixel size.
But social media images have another problem: cropping and positioning.
Imagine you have a 16:9 image containing a person and a large headline.
You convert it into a vertical 9:16 image.
The image technically has the correct dimensions, but the person's face may be pushed out of the frame and the headline may be partially cut off.
A basic resizer won't necessarily show you this problem.
A safe zone preview helps you identify it before downloading.
Resize One Image for Multiple Social Media Platforms
One of the biggest advantages of using a dedicated social media image resizer is that you don't have to manually create every version.
You can start with one image and preview different platform formats.
For example, you may need versions for:
- Instagram Post
- Instagram Reel Cover
- YouTube Thumbnail
- YouTube Shorts
- Facebook Post
- LinkedIn Post
- X Post
- WhatsApp Profile Picture
Instead of opening an image editor repeatedly and entering different dimensions, you can check multiple formats from one tool.
Try the free social media image resizer to preview these formats in one place.
Instagram Image Resizing
Instagram uses several different content formats, so the correct size depends on what you're creating.
A regular post, Reel cover, and other Instagram placements can display your image differently.
This becomes especially important for images containing text.
For example, suppose your design contains:
"50% OFF — SUMMER SALE"
If the text is positioned too close to the top or bottom, it may not appear correctly in every Instagram view.
A safe zone preview allows you to check the positioning before exporting.
For Instagram Reel covers in particular, it is useful to keep important content within the central area because the same cover may appear differently in different parts of Instagram.
YouTube Thumbnail Resizing
YouTube thumbnails are generally displayed in a landscape format, but that doesn't mean every part of your thumbnail has equal importance.
A good YouTube thumbnail often contains:
- A face
- Large headline text
- Product or object
- Brand logo
- Background graphics
If these elements are too close to the edges, they can become less effective when displayed at smaller sizes.
When creating a thumbnail, keep the main visual message easy to understand even when the image is displayed as a small preview.
You can use the Social Media Image Resizer to check the YouTube thumbnail dimensions and preview your composition.
Instagram Reel Covers and YouTube Shorts
Vertical content creates a different challenge.
A 9:16 image uses much more vertical space than a traditional landscape image.
This means your important content needs to be positioned carefully.
If you place text at the very top or bottom, it may compete with platform interface elements or appear differently when the content is displayed elsewhere.
A better approach is to keep the headline, face, logo, or main subject inside the central safe area.
This is especially useful when creating:
- Reel covers
- Shorts graphics
- Promotional videos
- Product advertisements
- Vertical social media campaigns
You can check the positioning using the Safe Zone Preview tool before downloading your final image.
Don't Forget the Focal Point
The focal point is the most important part of your image.
It could be:
- A person's face
- A product
- A logo
- A specific object
- A group of people
- The main subject of a photograph
When an image is cropped into a different aspect ratio, the focal point should remain visible.
For example, imagine a photograph where the person is standing on the right side.
If you automatically crop the image from the center, the person's face could disappear.
Instead, you can position the focal point around the person and let the crop happen around that location.
The Social Media Image Resizer with Safe Zone Preview includes a focal point control so you can tell the crop which part of the image matters most.
Smart Auto-Centering Can Make Resizing Easier
Manually positioning every image can take time.
That's why an automatic focal-point option can be useful.
Instead of starting from the exact center every time, you can use Smart Auto-Center to help identify the visually important part of the image.
You can then adjust the position manually if necessary.
This is particularly useful when processing photographs where the main subject isn't directly in the center.
How to Resize an Image for Social Media
The process is simple.
1. Upload Your Image
Open the Social Media Image Resizer and upload your JPG, PNG, or WEBP image.
You can drag and drop the image into the tool or select it from your device.
2. Set the Focal Point
Click on the main subject of your image.
If you're working with a portrait, this could be the person's face.
If you're creating a product post, it could be the product itself.
You can also use Smart Auto-Center to help position the focal point.
3. Select a Social Media Format
Choose the platform and format you need.
The preview will automatically adjust to that format.
4. Check the Safe Zone
Look at the green safe zone and the highlighted risk areas.
Make sure your most important text, logo, face, or product stays inside the recommended area.
5. Adjust the Zoom
If necessary, change the zoom level to improve the composition.
This can help when your original image contains too much empty space or when the subject needs to be larger.
6. Download the Final Image
Once everything looks correct, download the resized image.
You can also select multiple formats and export them together as a ZIP file.
How to Keep Text Safe on Social Media Images
If your image contains text, placement is extremely important.
Avoid putting important text directly against the edges.
Instead, create some breathing room around your headline.
For example, instead of:
LIMITED TIME OFFER
touching the top edge of the image, move it slightly toward the center.
The same principle applies to:
- Logos
- Prices
- Discount percentages
- Product names
- Website addresses
- Calls to action
- Important announcements
A few pixels of additional spacing can make your design much more reliable.
What About Faces and People?
Faces should usually receive special attention when resizing an image.
Automatic cropping can sometimes cut off:
- Foreheads
- Hair
- Shoulders
- Faces
- Hands
- Important body parts
If the person is the main subject, position the focal point around them before exporting.
This is one of the reasons a focal-point based resizer can be more useful than simply entering width and height.
Is It Better to Resize or Crop?
It depends on the original image and the target format.
If the aspect ratio is already close to the target format, resizing may require very little cropping.
If the aspect ratios are very different, some cropping may be unavoidable.
For example, converting a wide landscape photograph into a tall vertical image requires the tool to decide which parts of the original image should remain visible.
The goal isn't always to eliminate cropping.
The goal is to control the cropping so the important content stays visible.
Why Previewing Before Downloading Matters
A common mistake is downloading an image first and checking it only after uploading it to social media.
By then, you may have to return to your image editor, change the design, export another version, and upload it again.
A live preview makes the process faster.
You can immediately see:
- The target dimensions
- The crop
- The focal point
- Risky areas
- The recommended safe area
- How your subject fits inside the frame
This can save time when creating multiple social media assets.
Privacy: Your Images Stay in Your Browser
Privacy is another important consideration when working with personal photographs, client designs, or product images.
The Instant Convert Tools Social Media Image Resizer is designed to process images directly in your browser.
Your image doesn't need to be uploaded to a server just to resize or preview it.
This makes browser-based processing useful for people who don't want to upload their images to another service.
Who Can Use a Social Media Image Resizer?
This type of tool can be useful for many different people.
Social Media Managers
Social media managers often create content for several platforms at the same time.
Instead of manually creating every version, they can check multiple formats from one image.
Content Creators
YouTubers, Instagram creators, and other content creators can use safe zones to make sure titles and faces remain visible.
Small Businesses
Businesses creating promotional graphics can quickly prepare different versions for different social networks.
Designers
Designers can use the preview as a quick final check before exporting their work.
Ecommerce Sellers
Product photos and promotional graphics often need to be adapted to different platforms. Keeping the product and promotional text visible can make the final image more effective.
Final Thoughts
Resizing an image for social media isn't only about getting the correct pixel dimensions.
The real challenge is keeping the important parts of the image visible after the platform crops and displays it.
That's why focal points and safe zones are important.
Instead of creating multiple designs from scratch, start with one image, choose the target platform, check the safe zone, adjust the focal point, and export the correct format.
If you regularly create images for Instagram, YouTube, Facebook, LinkedIn, X, or WhatsApp, you can try the Free Social Media Image Resizer with Safe Zone Preview and check your image before publishing it.
Related Free Image Tools
If you're working with images regularly, you may also find these tools useful:
Image to WEBP Converter — Convert JPG and PNG images to WEBP for modern web use.
Bulk Image Title Generator — Generate titles for multiple images at once.
PDF to WEBP Converter — Convert PDF pages into WEBP images.
Using these tools together can make a simple image workflow much faster, from preparing images to optimizing them for websites and social media.